Rancher
StorageOS is a certified Rancher application. We offer two installation methods:
- Rancher Catalogue - this is the easiest and requires just a few clicks
- Manual - allowing more control and visibility
Before proceeding, ensure that you have followed our prerequisites. On Rancher, pay particular attention to the OS version and image used - some platforms require extra mainline kernel modules to be enabled.
Catalog Install
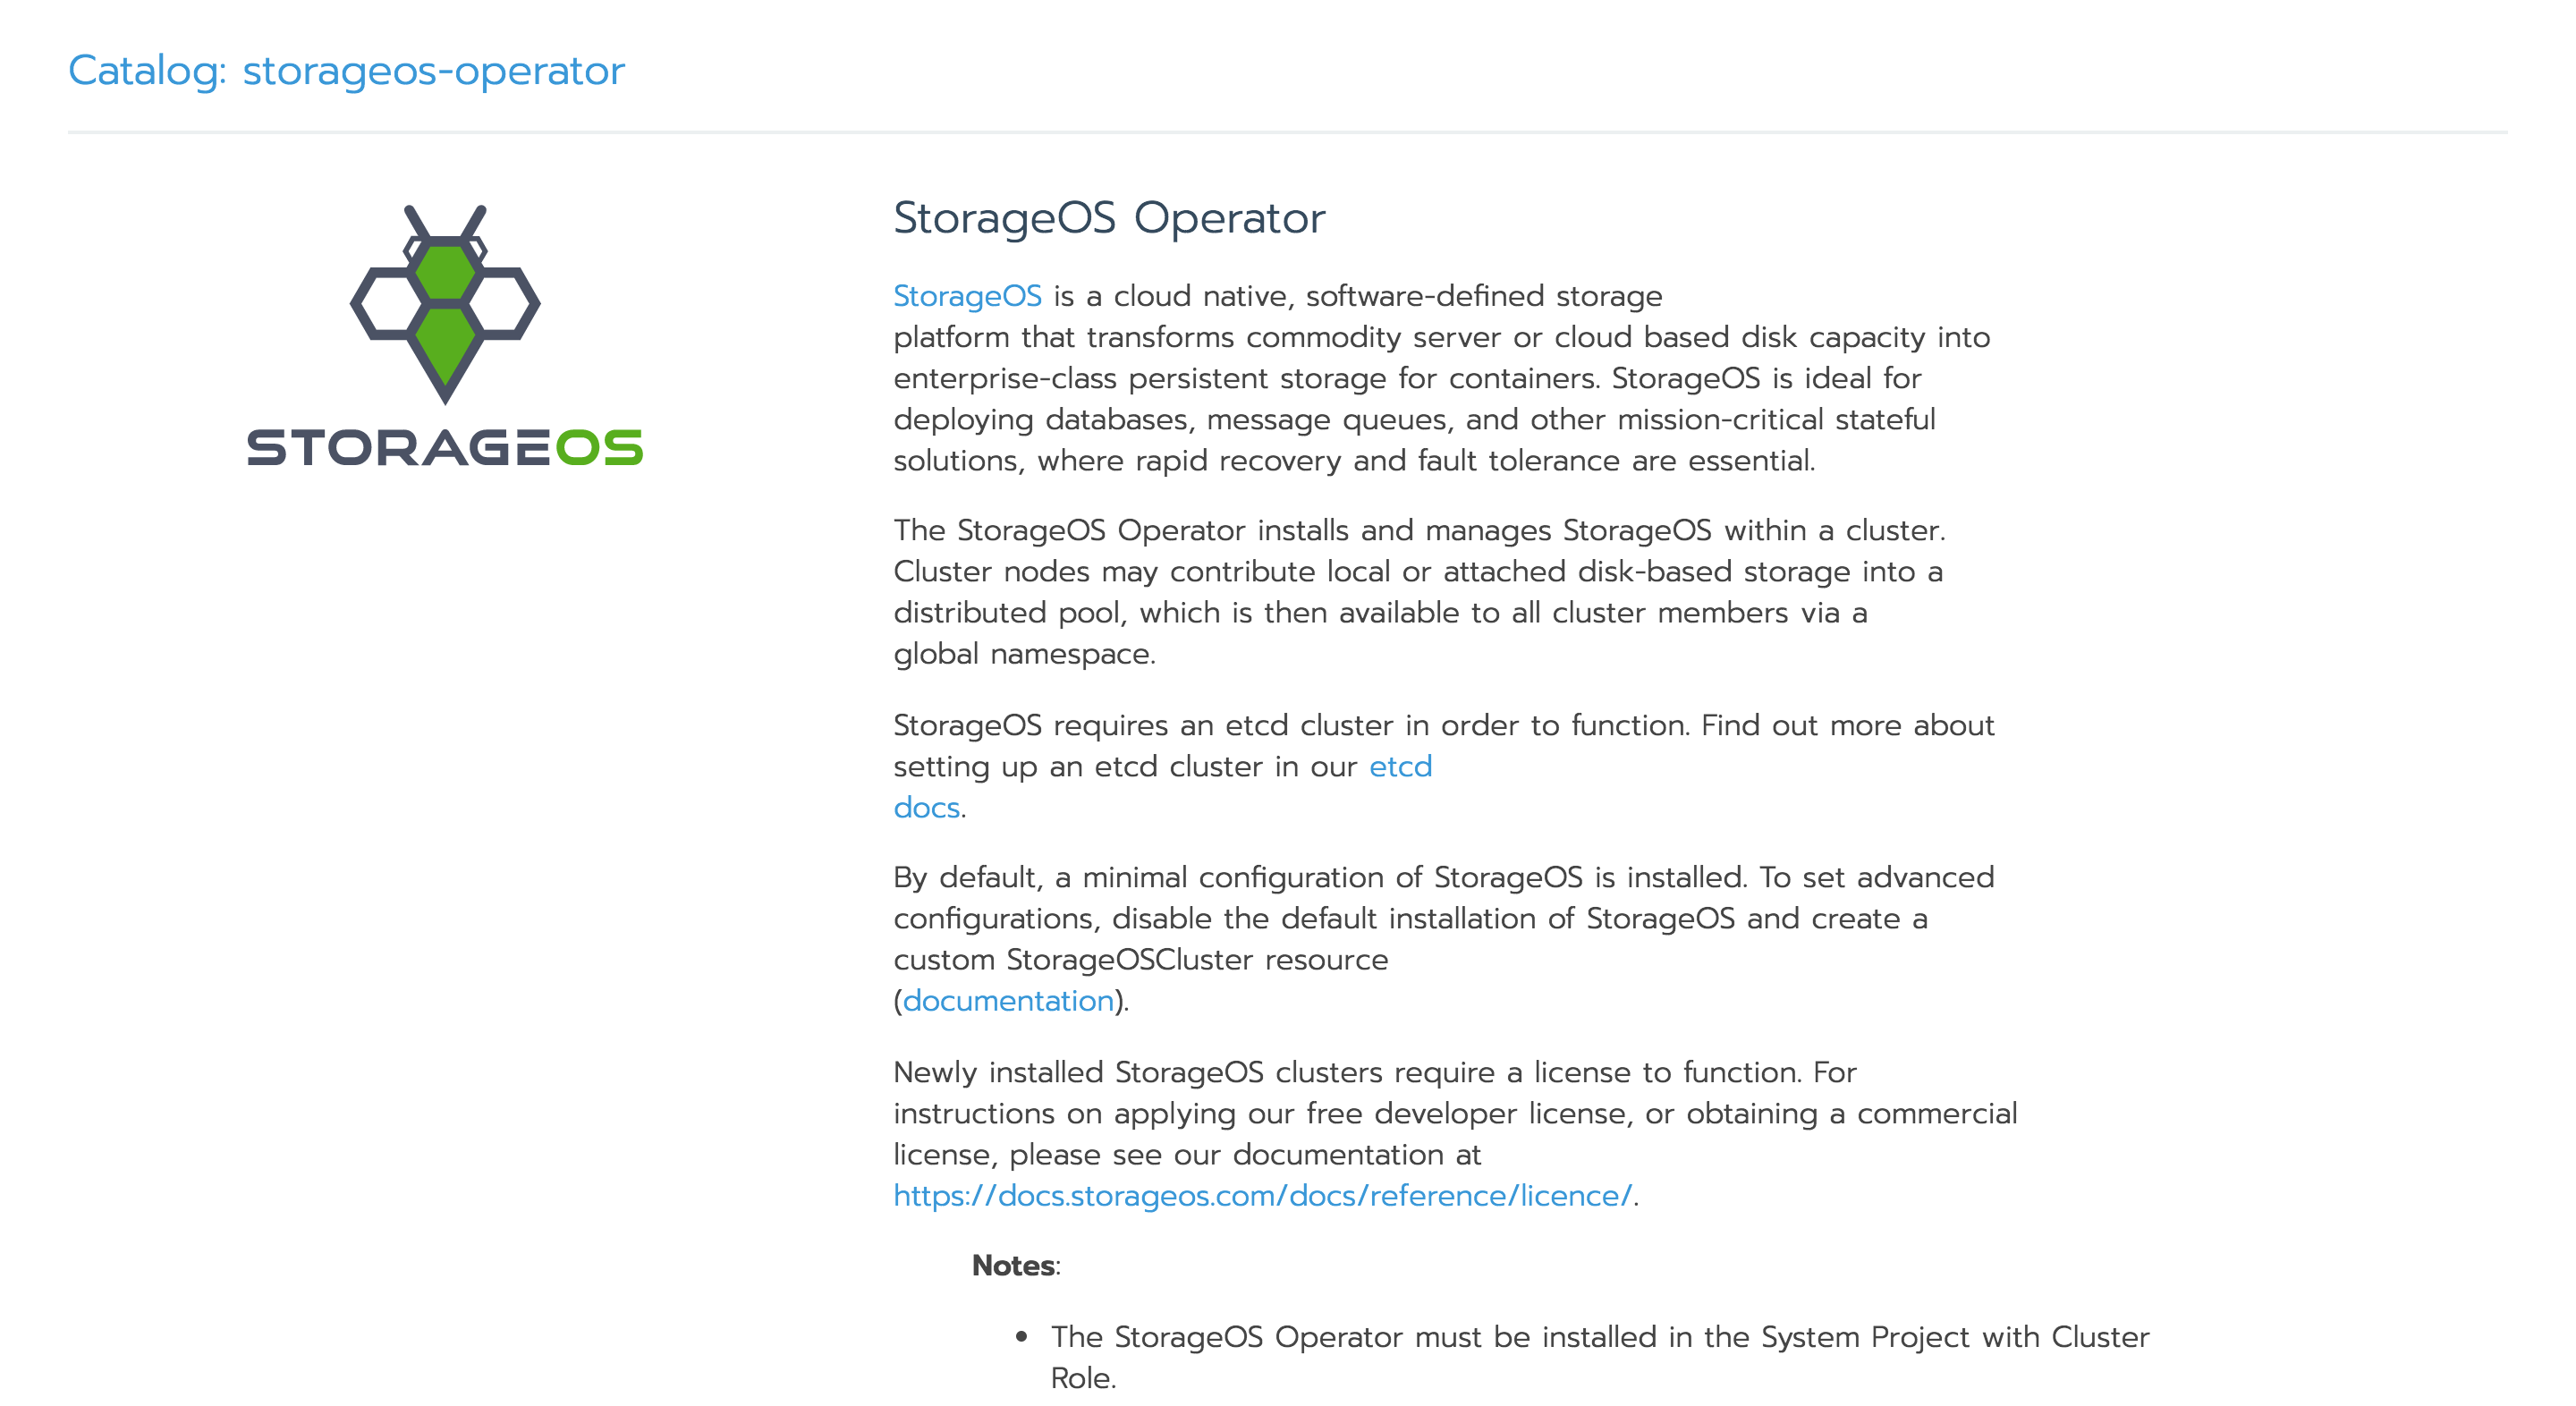
StorageOS is a Certified application in the Rancher Catalog. You can install StorageOS using the Rancher application install.
Before completing the steps below, you will need an etcd cluster. For evaluations it is sufficient to use our simple test recipe. For production installations, please follow our production recipe. Make a note of the etcd endpoint URL in either case.
-
Select the
Systemproject of your cluster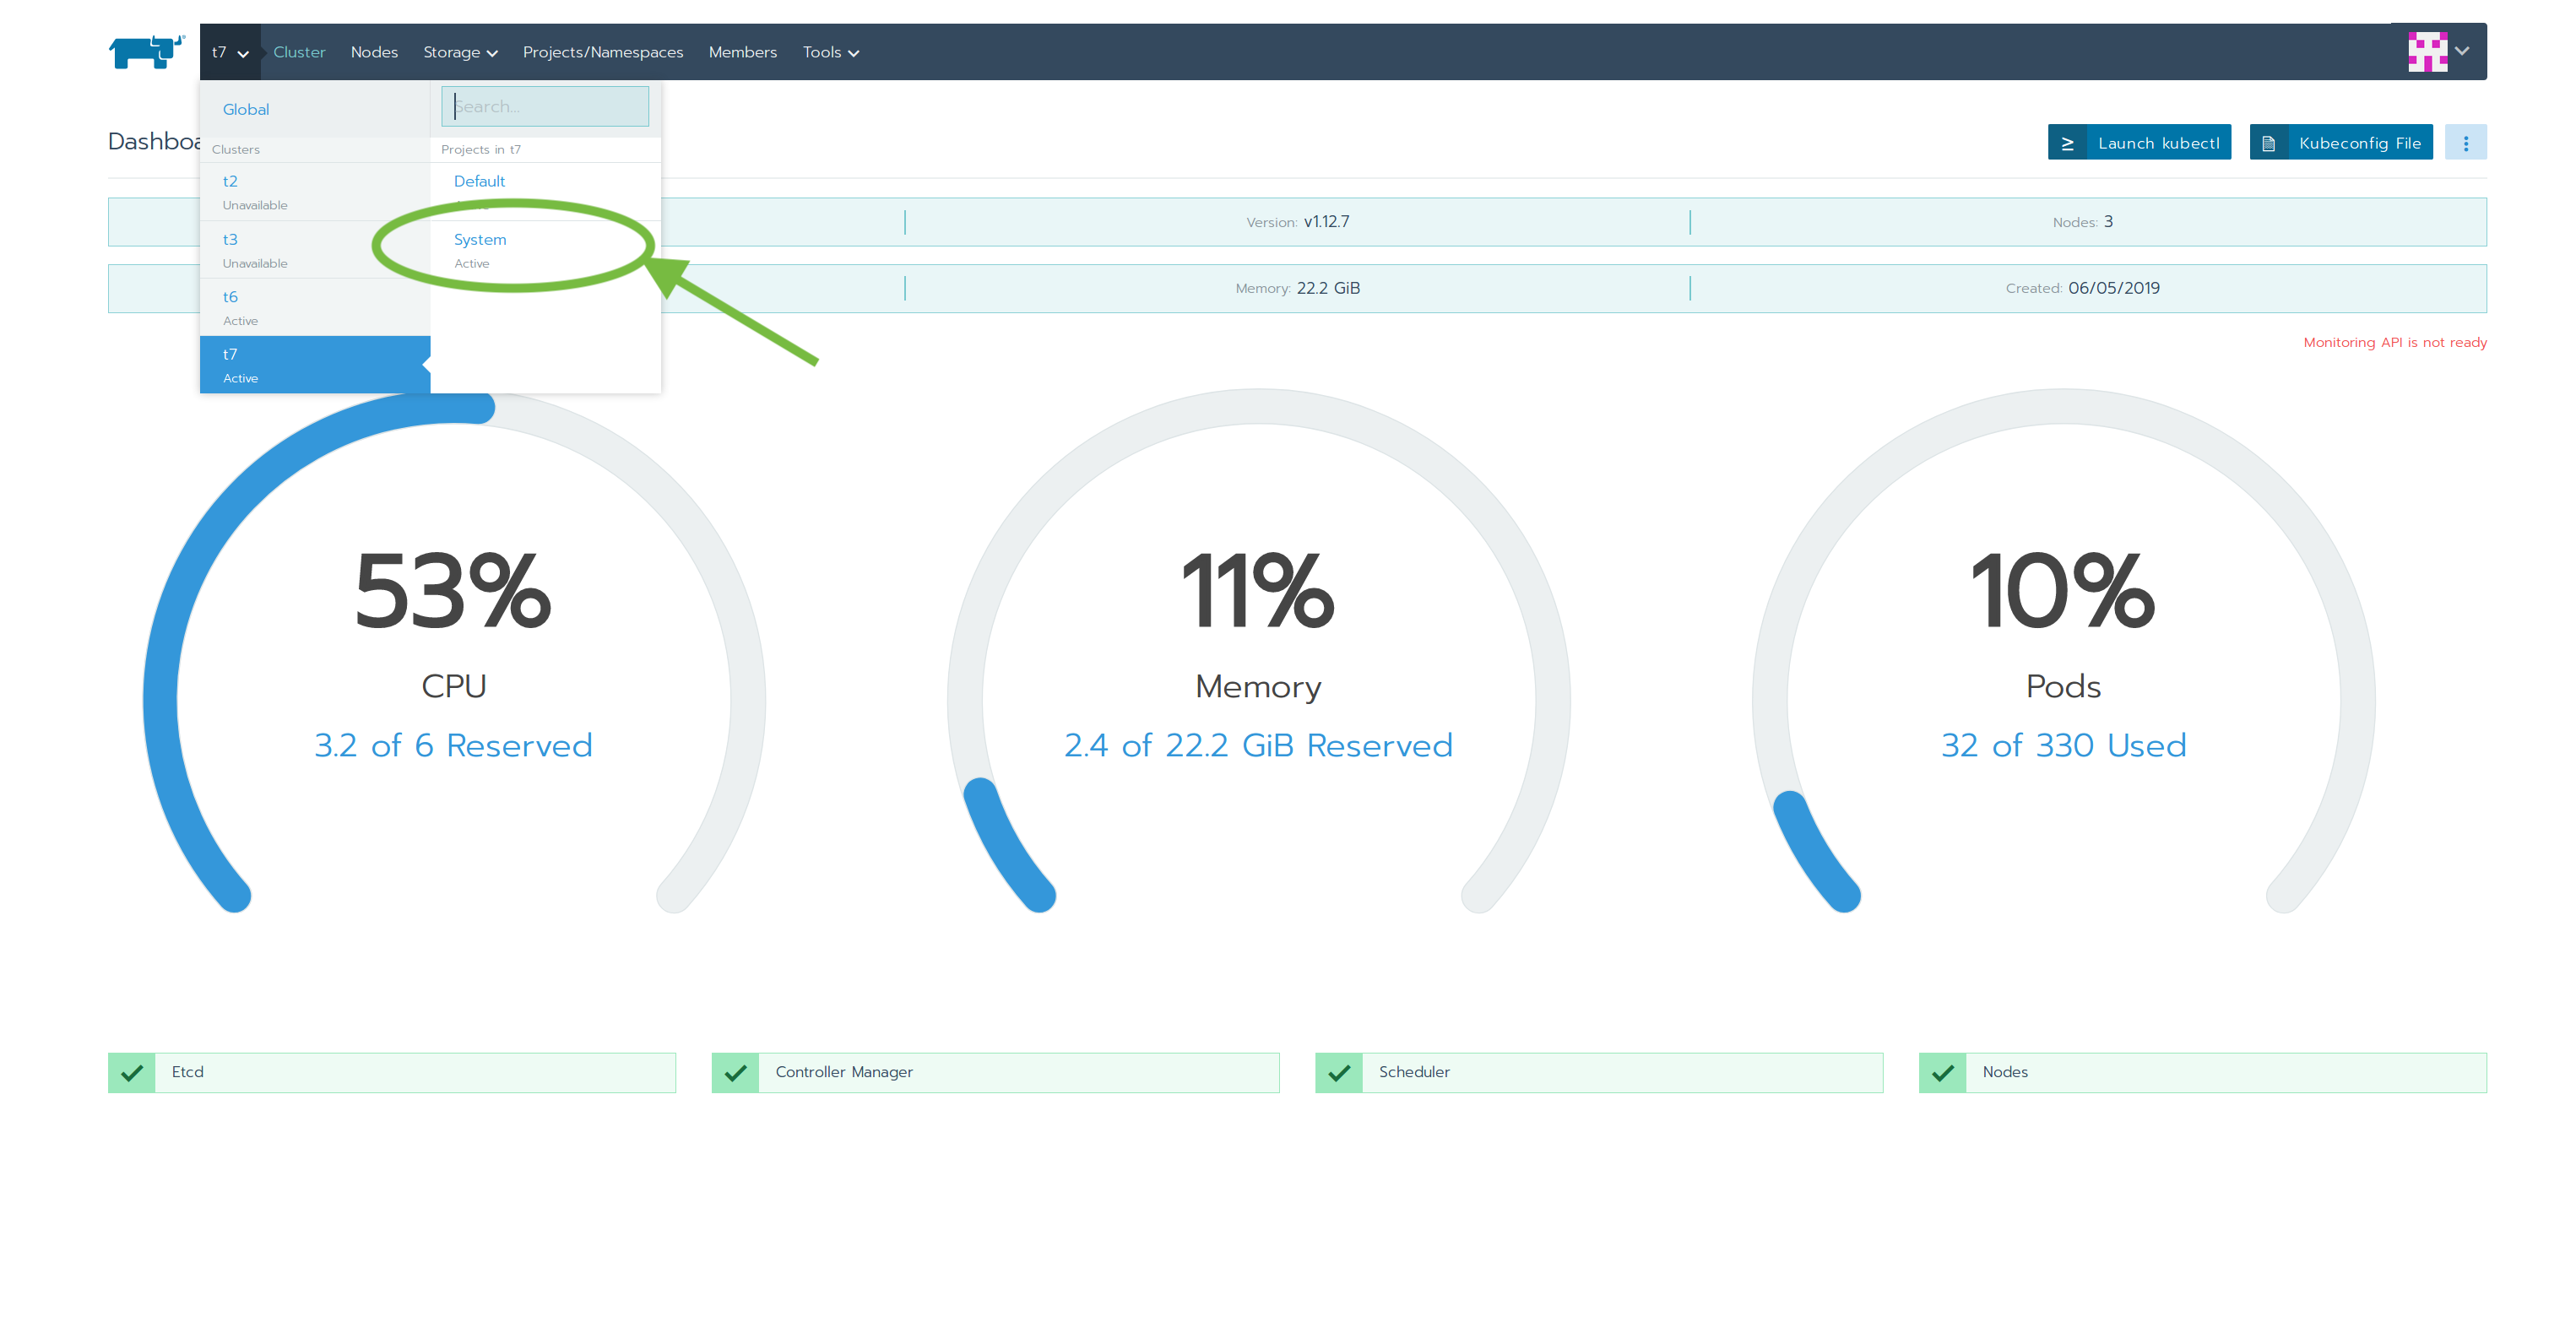
-
Select the
Appstab and clickLaunch
-
Search for StorageOS and click on the App
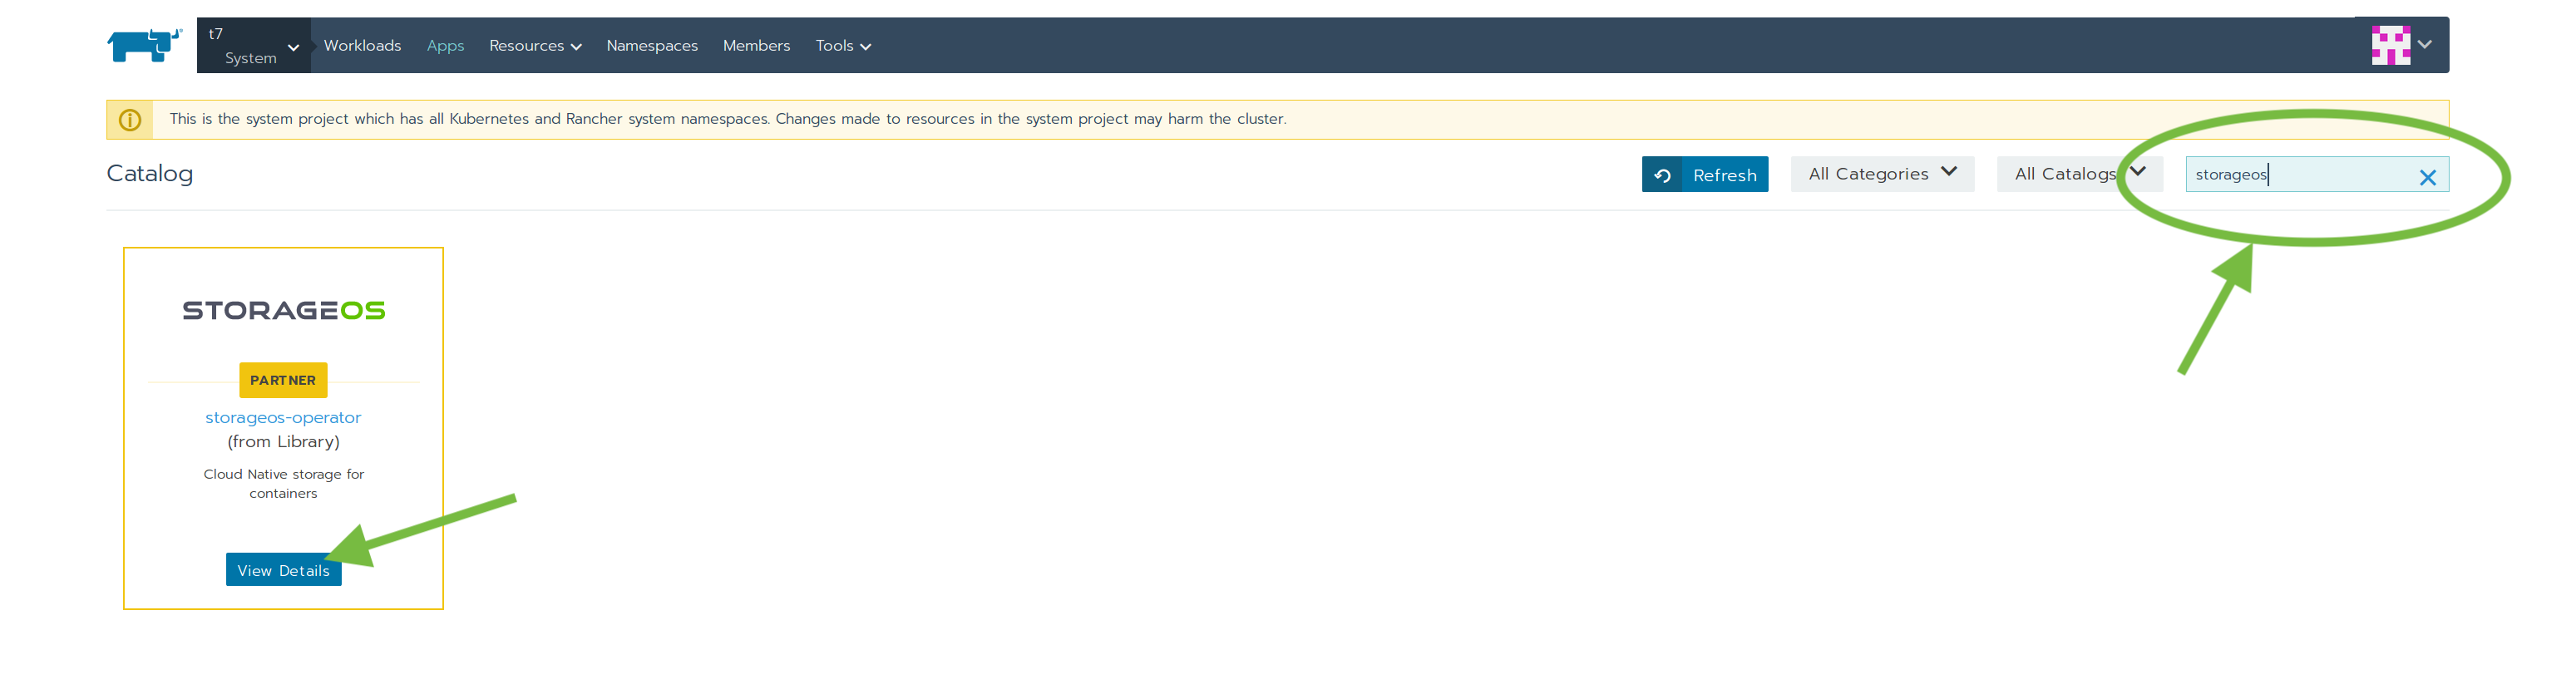
This will install the StorageOS operator, which manages the StorageOS DaemonSet.
-
Check and ammend installation options
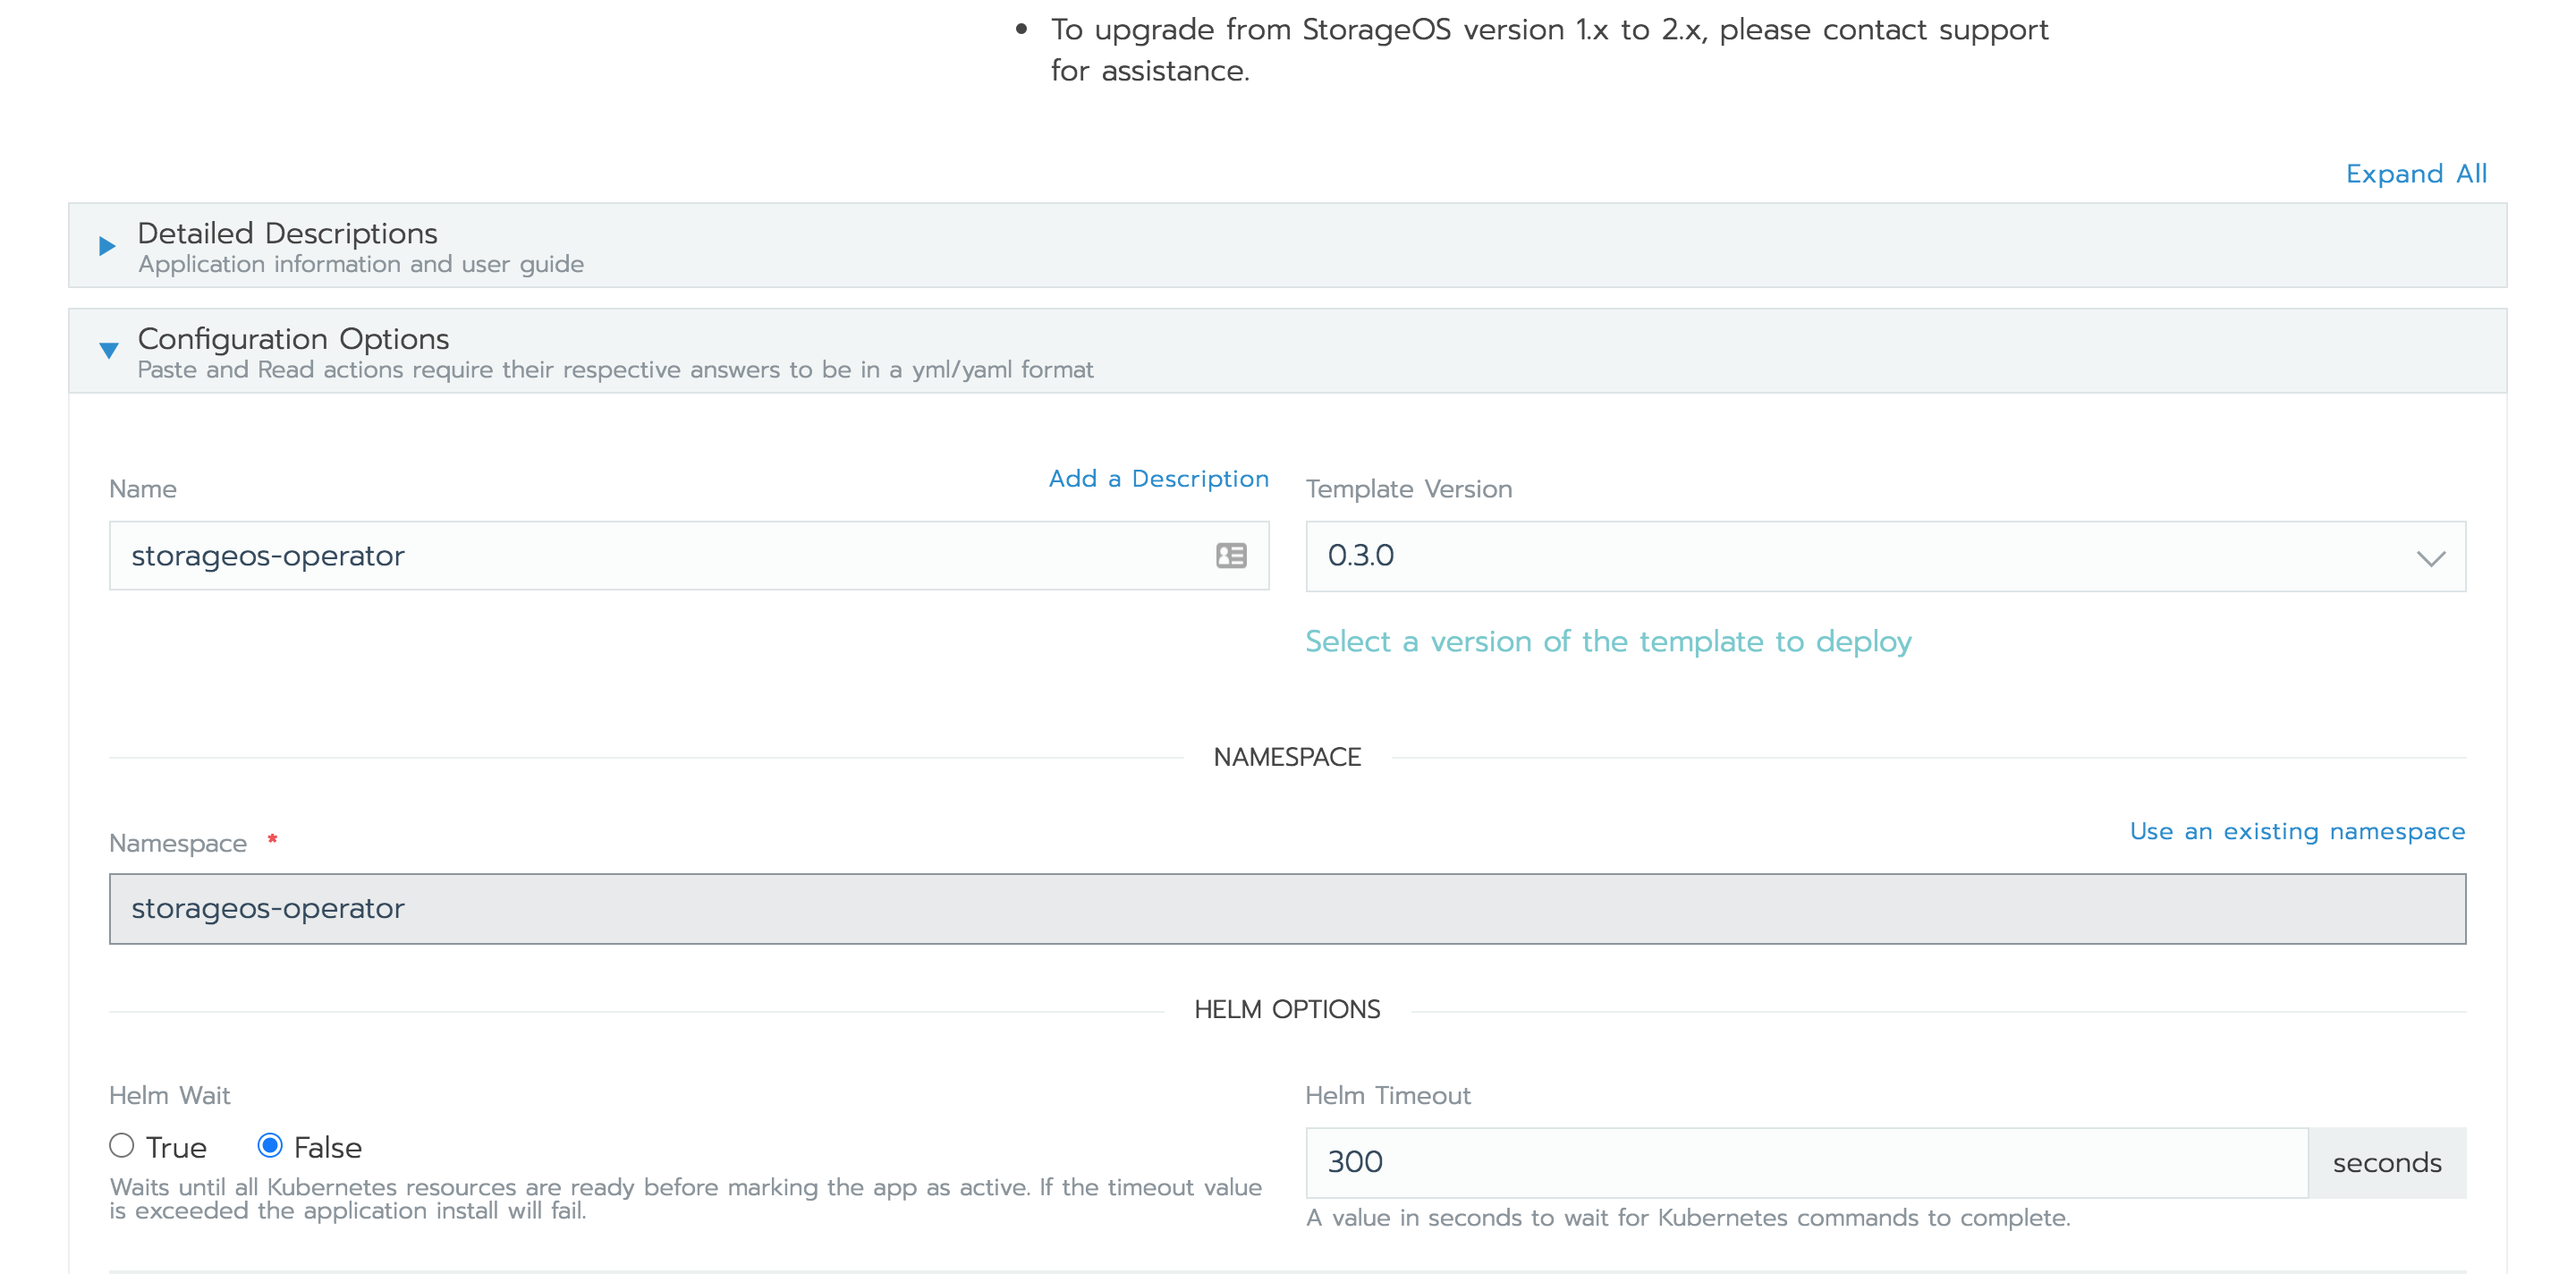
A generic configuration for StorageOS is preset using the default values in the form. Be sure to check the etcd address and ensure it matches the value you noted at the beginning of this guide.
The catalog form exposes several useful parameters - documented below.
For further customization, you can opt to set the option to ‘Install StorageOS Cluster’ to false and install a custom CR. See below for this.
-
Launch the StorageOS cluster

-
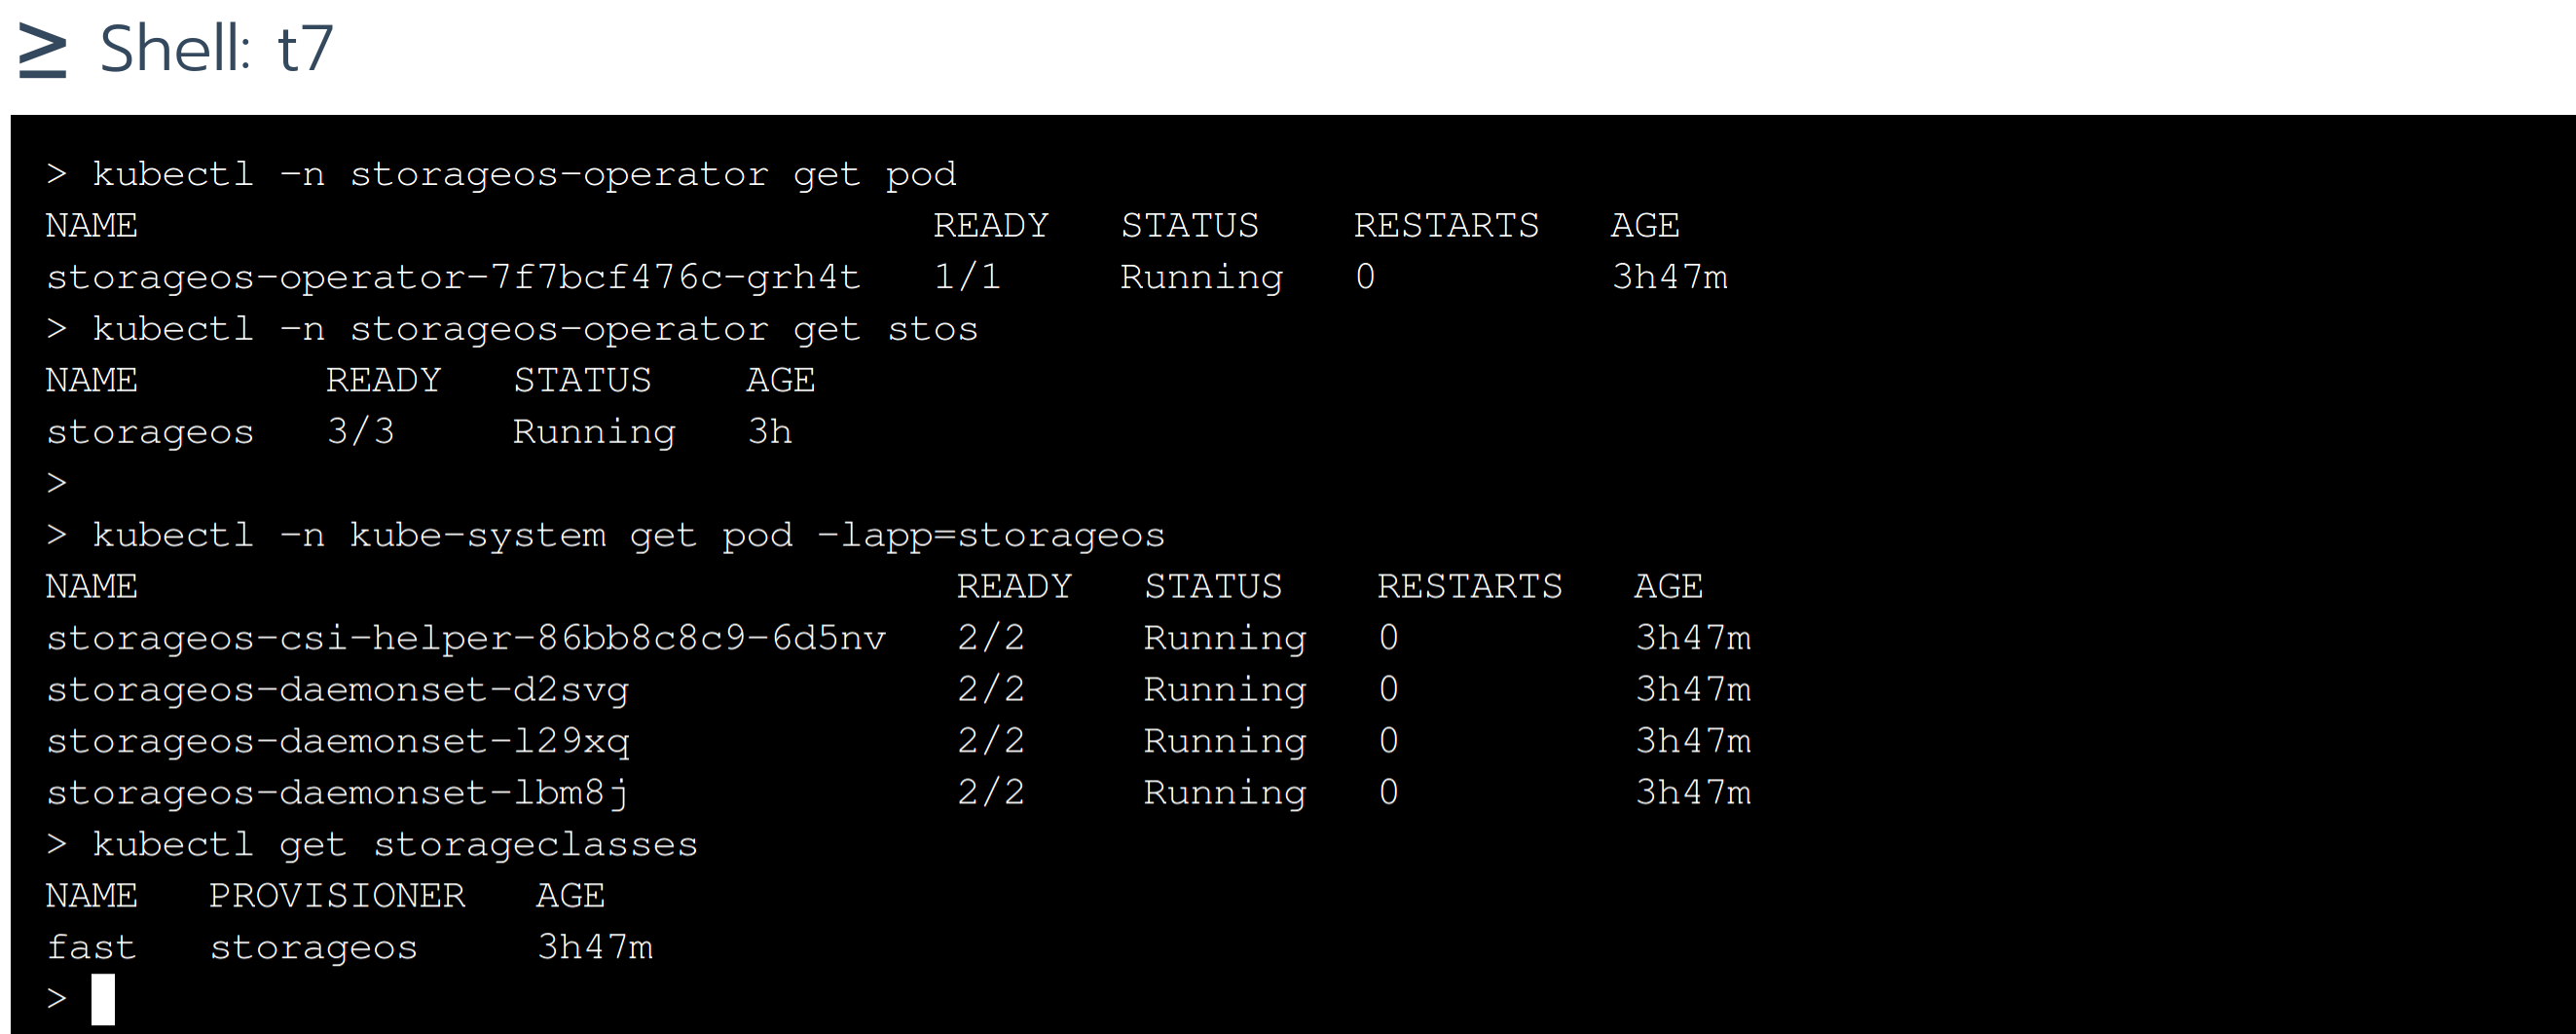
Verify the cluster bootstrap has successfully completed
-
License the newly installed cluster
Newly installed StorageOS clusters must be licensed within 24 hours. Our developer license is free, and supports up to 5TiB of provisioned storage.
You will need access to the StorageOS API on port 5705 of any of your nodes. For convenience, it is often easiest to port forward the service using the following kubectl incantation (this will block, so a second terminal window may be advisable):
$ kubectl port-forward -n kube-system svc/storageos 5705Now follow the instructions on our licensing operations page to obtain and apply a license.
Installation of StorageOS is now complete.
Simple Customization - Modify Catalog Form
The following options are exposed by the catalog form to allow some simple customization of the StorageOS installation.
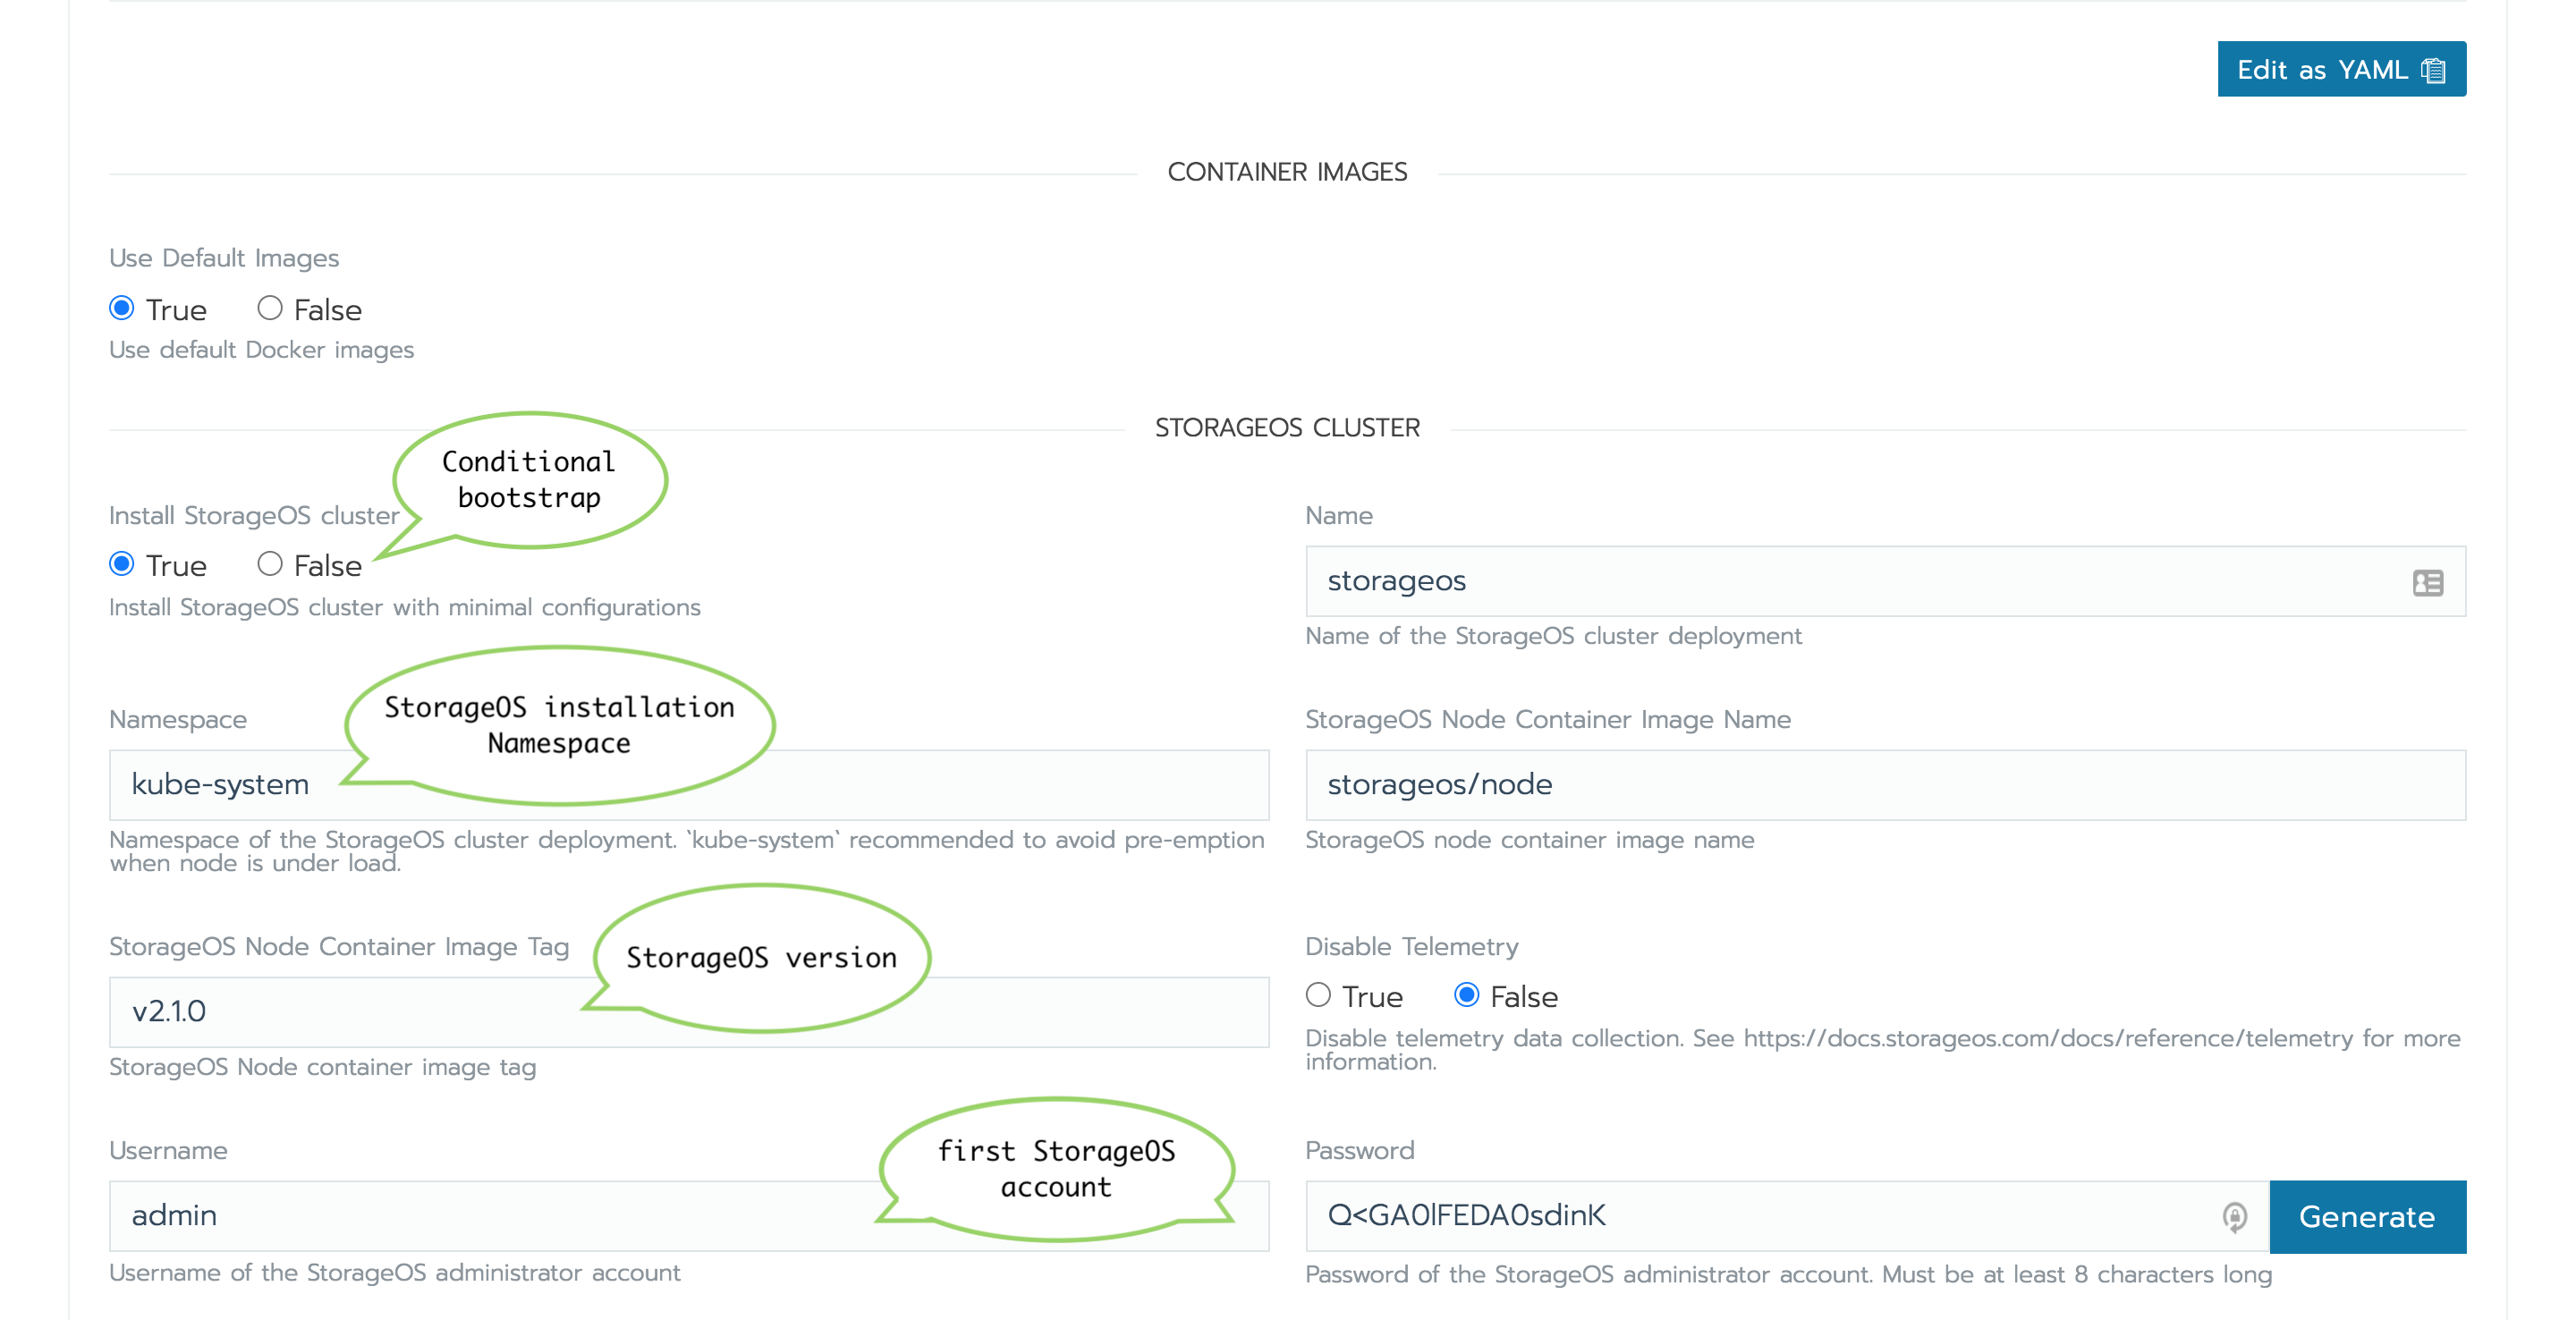
- Cluster Operator namespace : The Kubernetes namespace where the StorageOS Cluster Operator and other resources will be created.
- Container Images : By default images are pulled from DockerHub, you can
- specify the image URLs when using private registries.
- Install StorageOS cluster
: Controls the automatic deployment of StorageOS after installing the Cluster
Operator. If set to
false, the Operator will be created, but a Custom Resource will not be applied to the cluster. Launch the operator and proceed to the section Advanced Customization below. - Namespace : The Kubernetes namespace where StorageOS will be
installed. By default, StorageOS installs into the
kube-systemnamespace, which will add a priority class to ensure high priority resource allocation. Installing StorageOS with the priority class prevents StorageOS from being evicted during periods of resource contention. It is inadvisable to modify this under normal circumstances. - Username/Password : Default Username and Password for the admin account
to be created at StorageOS bootstrap. A random password will be generated by
leaving the field empty or clicking the
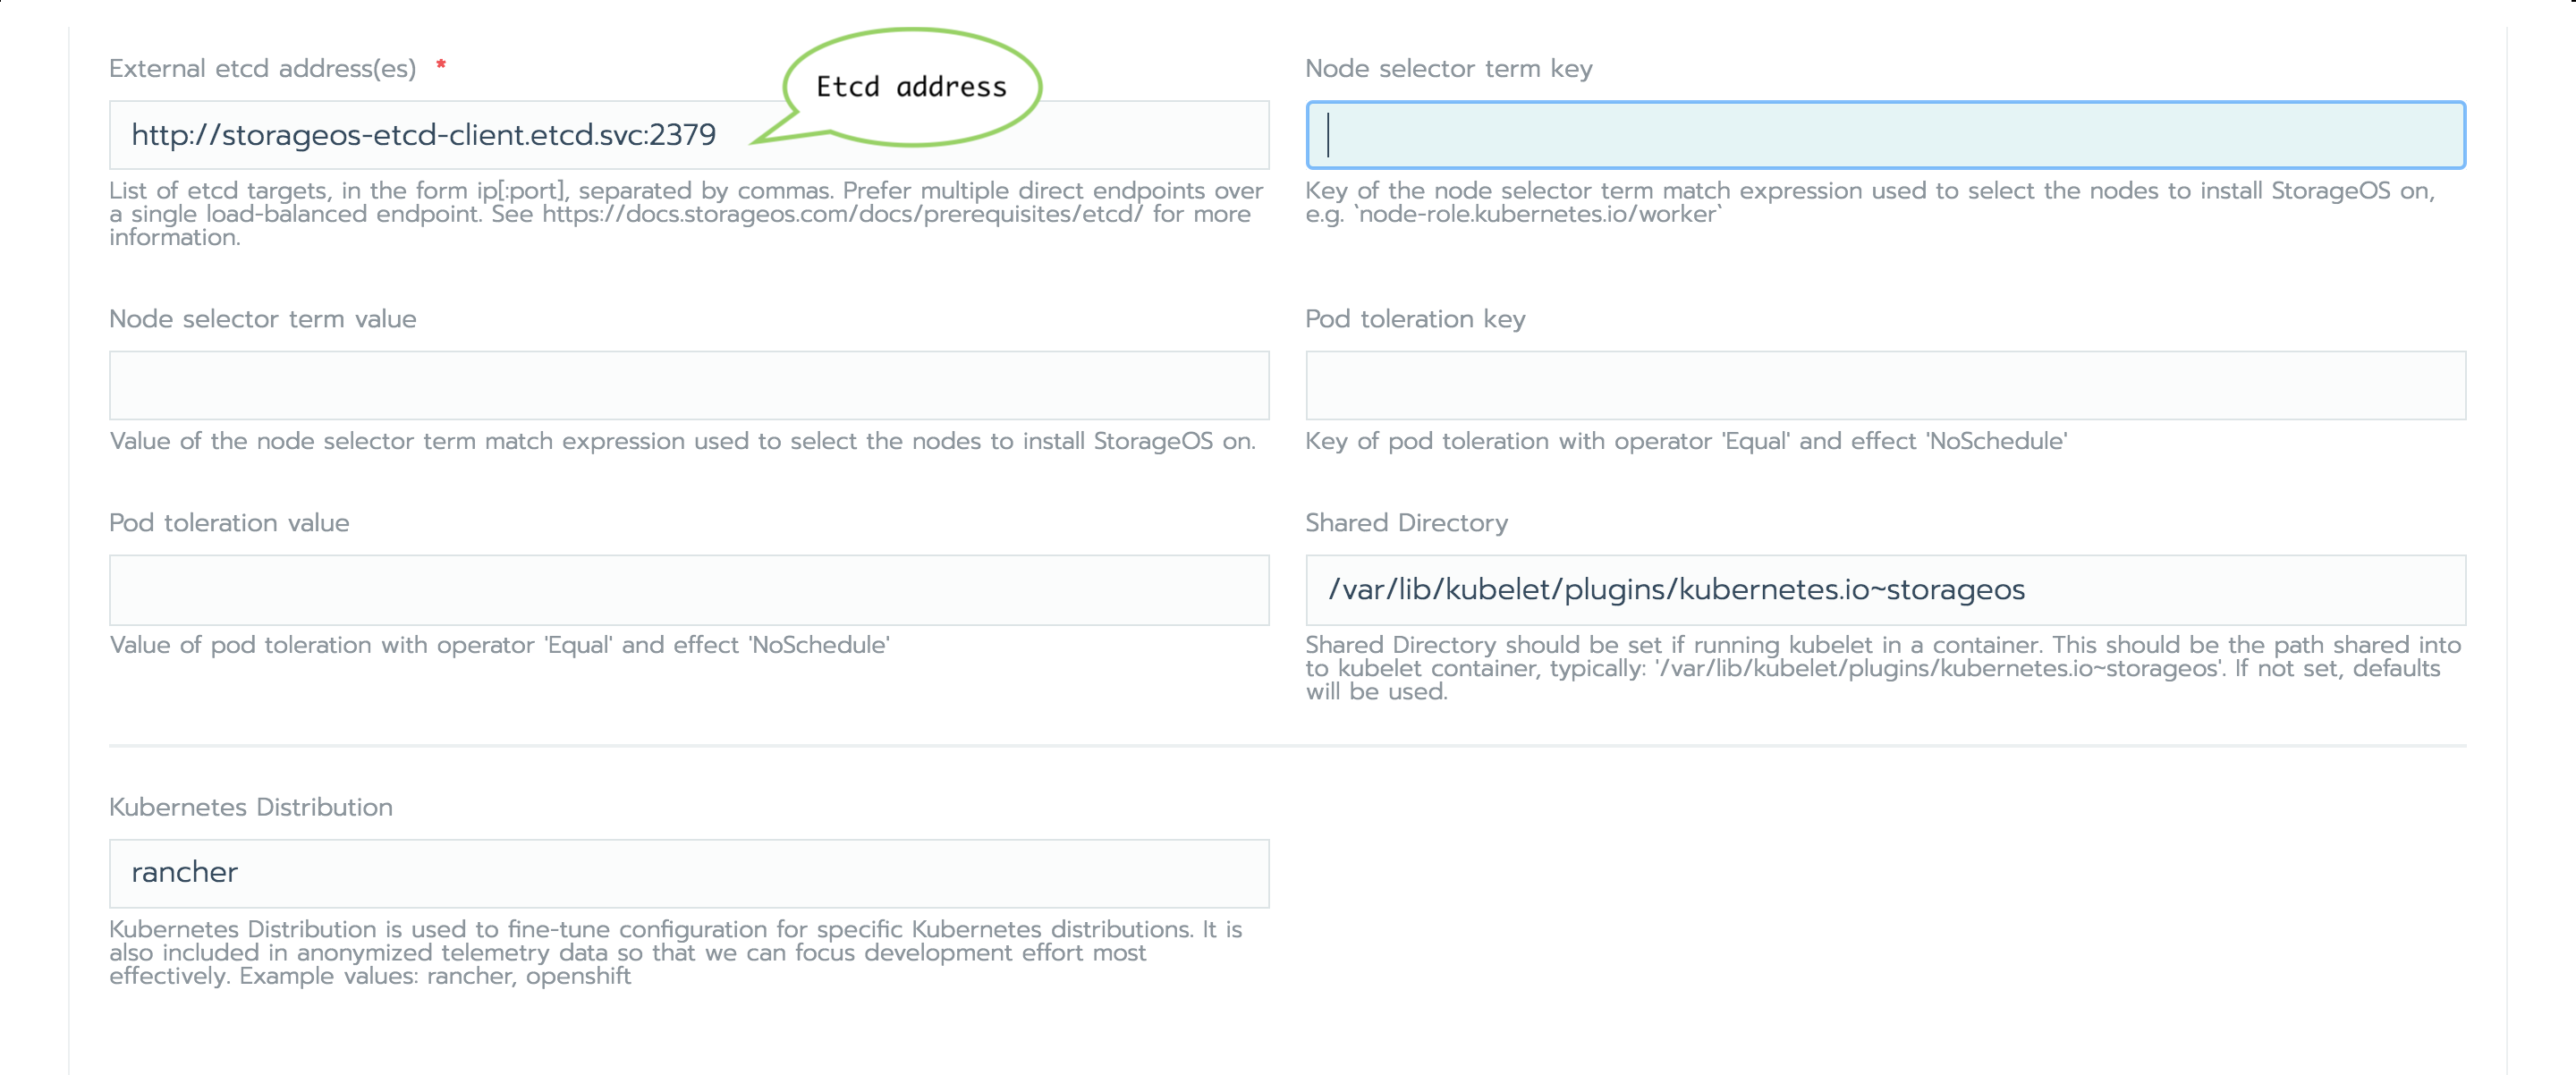
Generatebutton. - External etcd address(es) : Connection and configuration details for an external Etcd cluster.See our documentation here.
- Node Selectors and Tolerations : Control placement of StorageOS DaemonSet Pods. StorageOS will only be installed on the selected nodes.
- Tolerations : Define any tolerations you wish the DaemonSet to observe.
Advanced Customization - Apply Custom CR
If Install StorageOS Cluster was set to false, StorageOS will not be
bootstrapped automatically. After the StorageOS Operator is installed, you can
now create a Custom Resource that describes the StorageOS cluster.
-
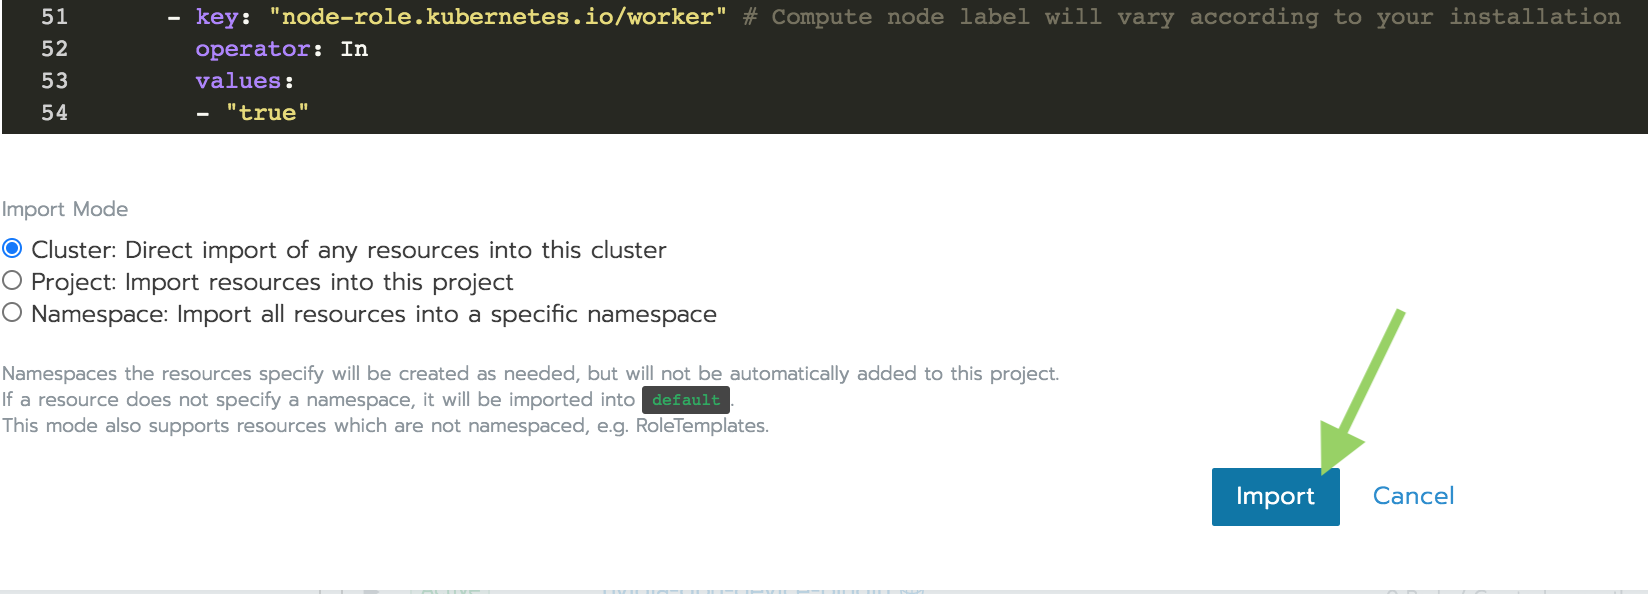
Select the
System WorkloadsandImport YAML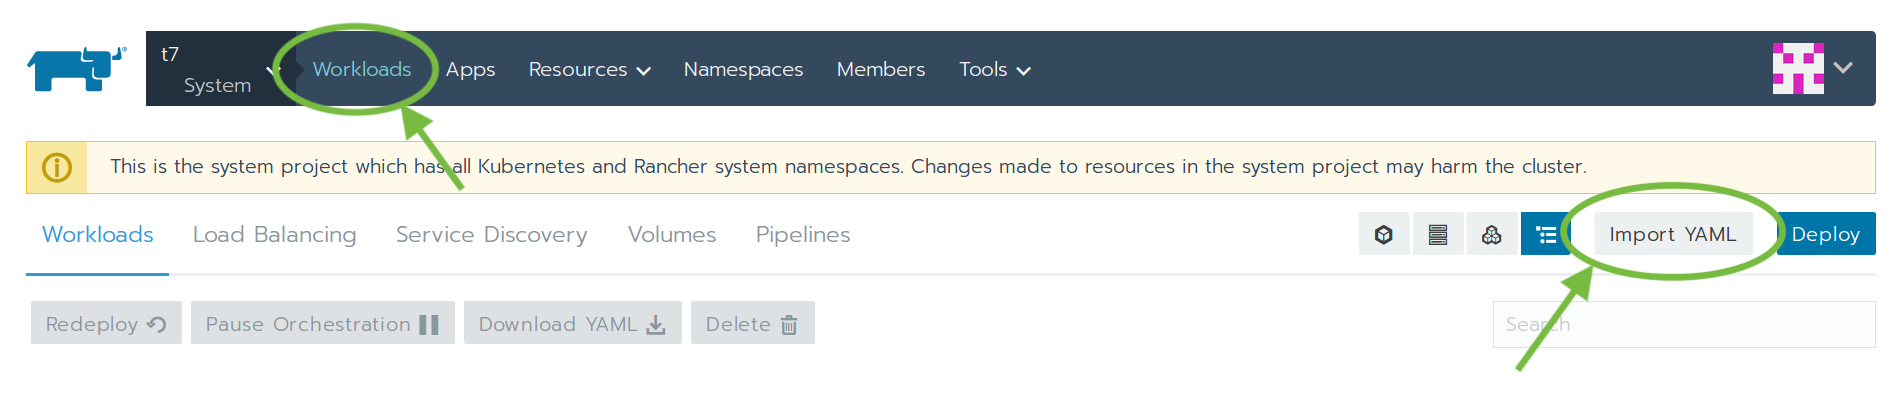
-
Create the
SecretandCustomResource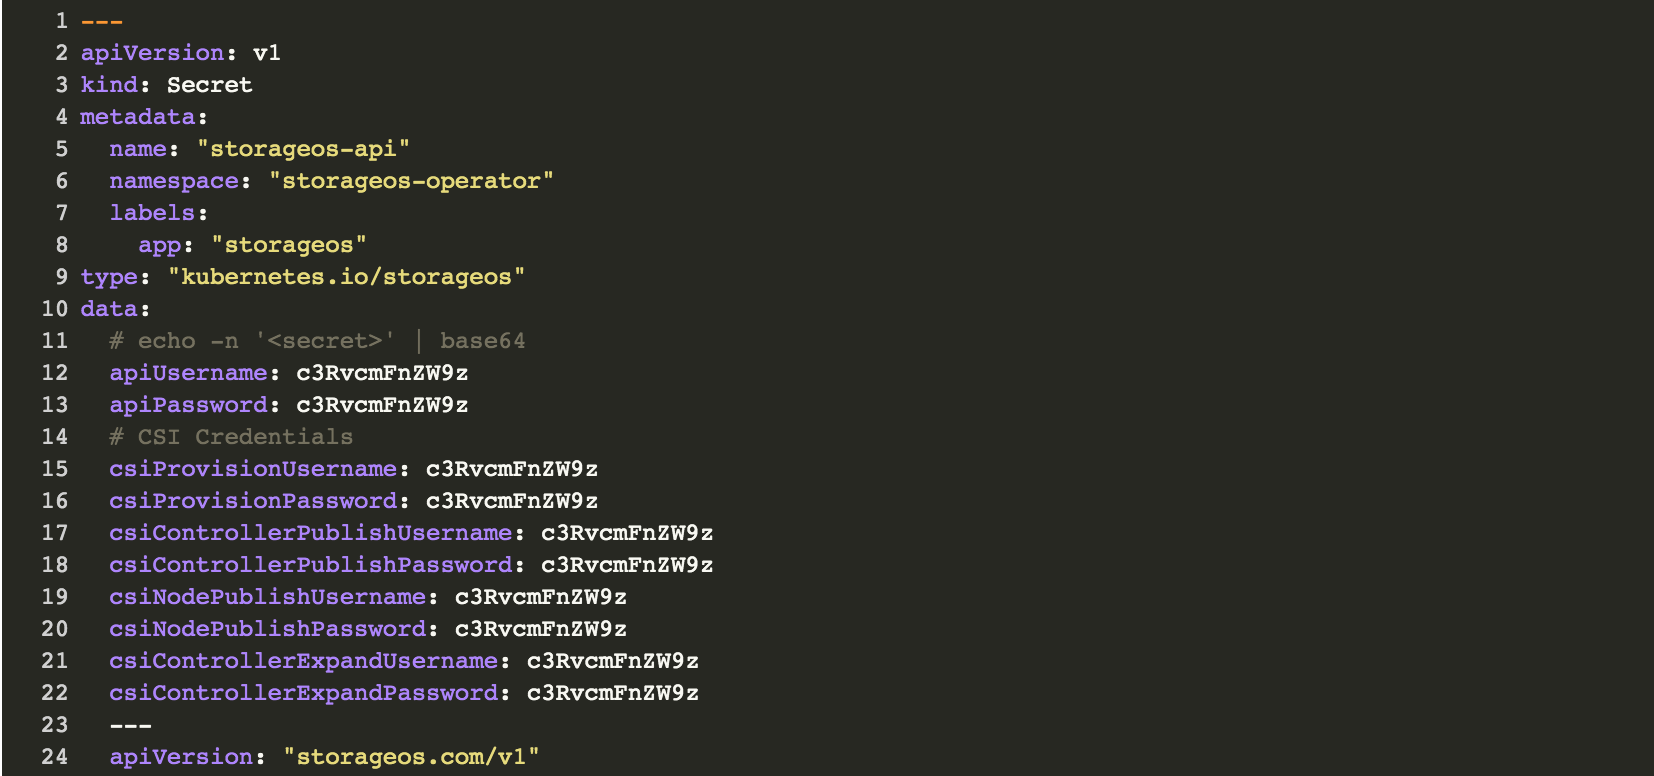
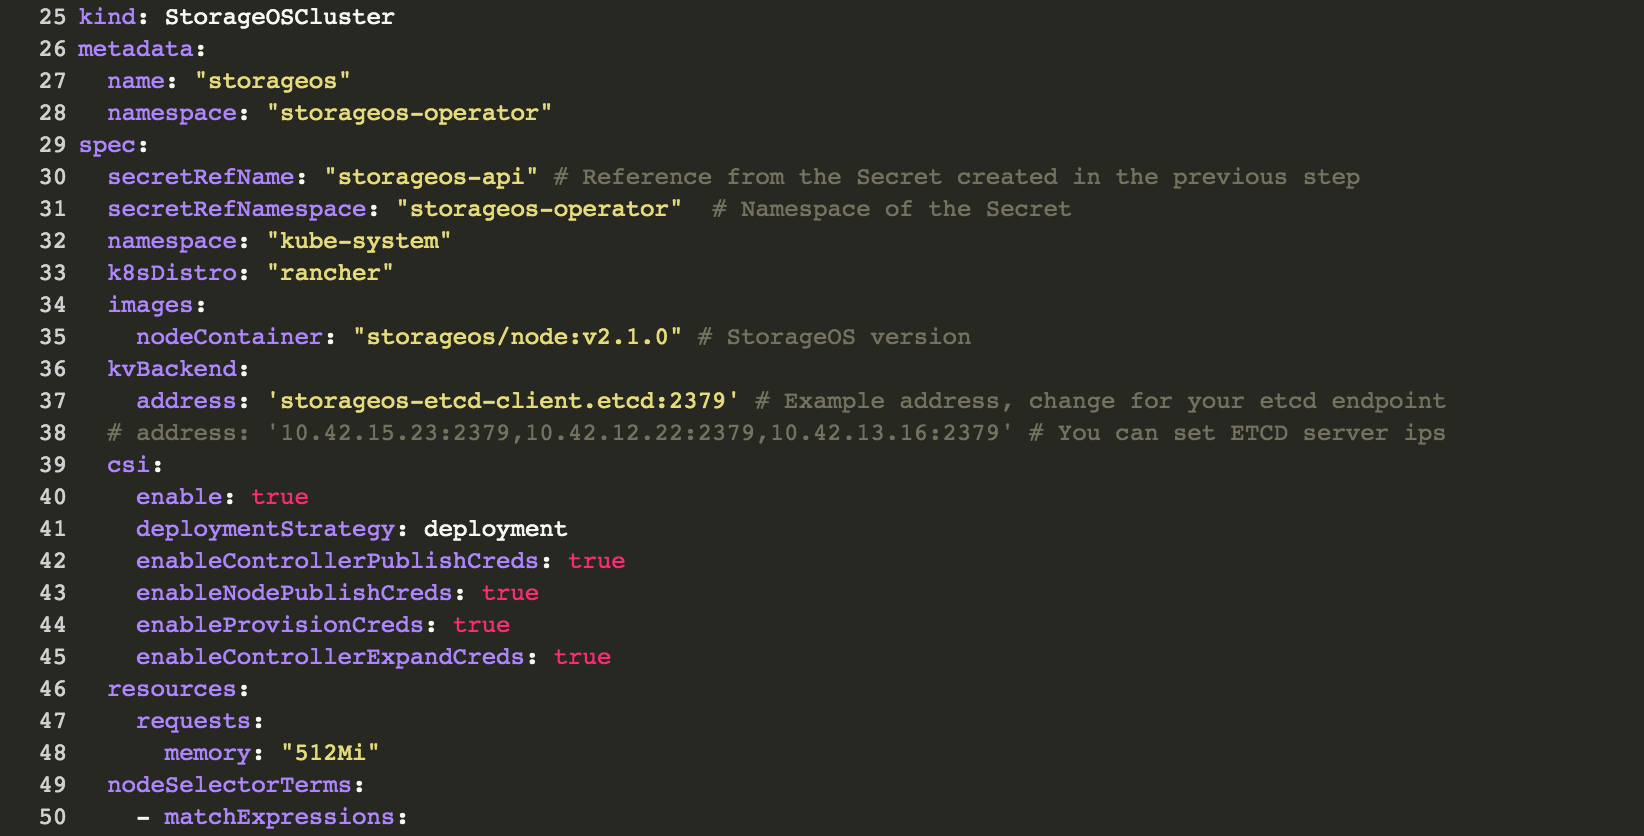
This is an example.
---
apiVersion: v1
kind: Secret
metadata:
  name: "storageos-api"
  namespace: "storageos-operator"
  labels:
    app: "storageos"
type: "kubernetes.io/storageos"
data:
  # echo -n '<secret>' | base64
  apiUsername: c3RvcmFnZW9z
  apiPassword: c3RvcmFnZW9z
  # CSI Credentials
  csiProvisionUsername: c3RvcmFnZW9z
  csiProvisionPassword: c3RvcmFnZW9z
  csiControllerPublishUsername: c3RvcmFnZW9z
  csiControllerPublishPassword: c3RvcmFnZW9z
  csiNodePublishUsername: c3RvcmFnZW9z
  csiNodePublishPassword: c3RvcmFnZW9z
  csiControllerExpandUsername: c3RvcmFnZW9z
  csiControllerExpandPassword: c3RvcmFnZW9z
---
apiVersion: "storageos.com/v1"
kind: StorageOSCluster
metadata:
  name: "storageos"
  namespace: "storageos-operator"
spec:
  # StorageOS Pods are in kube-system by default
  secretRefName: "storageos-api" # Reference from the Secret created in the previous step
  secretRefNamespace: "storageos-operator"  # Namespace of the Secret
  k8sDistro: "rancher"
  images:
    nodeContainer: "storageos/node:v2.4.0-rc.1" # StorageOS version
  kvBackend:
    address: 'storageos-etcd-client.etcd:2379' # Example address, change for your etcd endpoint
  # address: '10.42.15.23:2379,10.42.12.22:2379,10.42.13.16:2379' # You can set ETCD server ips
  sharedDir: '/var/lib/kubelet/plugins/kubernetes.io~storageos' # Needed when Kubelet as a container
  resources:
    requests:
      memory: "512Mi"
  nodeSelectorTerms:
    - matchExpressions:
      - key: "node-role.kubernetes.io/worker" # Compute node label will vary according to your installation
        operator: In
        values:
        - "true"
Additional
specparameters are available on the Cluster Operator configuration page.You can find more examples such as deployments referencing a external etcd kv store for StorageOS in the Cluster Operator examples page.
Manual Installation
The StorageOS Cluster Operator is a Kubernetes native application developed to deploy and configure StorageOS clusters, and assist with maintenance operations. We recommend its use for standard installations.
The operator is a Kubernetes controller that watches the StorageOSCluster
CRD. Once the controller is ready, a StorageOS cluster definition can be
created. The operator will deploy a StorageOS cluster based on the
configuration specified in the cluster definition.
Helm Note: If you want to use Helm to install StorageOS, follow the StorageOS Operator Helm Chart documentation.
Steps to install StorageOS:
- Install StorageOS Operator
- Create a Secret for default username and password
- Trigger bootstrap using a CustomResource
- Apply StorageOS licence
1. Install StorageOS operator
Install the StorageOS Cluster Operator using the following yaml manifest.
kubectl create -f https://github.com/storageos/cluster-operator/releases/download/v2.4.0-rc.1/storageos-operator.yaml
Verify the Cluster Operator Pod Status
[root@master03]# kubectl -n storageos-operator get pod
NAME                                         READY     STATUS    RESTARTS   AGE
storageoscluster-operator-68678798ff-f28zw   1/1       Running   0          3m
The READY 1/1 indicates that
storageosclusterresources can be created.
2. Create a Secret
Before deploying a StorageOS cluster, create a Secret defining the StorageOS API Username and Password in base64 encoding. The API username and password are used to create the default StorageOS admin account which can be used with the StorageOS CLI and to login to the StorageOS GUI. The CSI credentials are used to register the CSI accounts, so Kubernetes and StorageOS communicate over an authenticated API.
apiVersion: v1
kind: Secret
metadata:
  name: "storageos-api"
  namespace: "storageos-operator"
  labels:
    app: "storageos"
type: "kubernetes.io/storageos"
data:
  # echo -n '<secret>' | base64
  apiUsername: c3RvcmFnZW9z
  apiPassword: c3RvcmFnZW9z
  # CSI Credentials
  csiProvisionUsername: c3RvcmFnZW9z
  csiProvisionPassword: c3RvcmFnZW9z
  csiControllerPublishUsername: c3RvcmFnZW9z
  csiControllerPublishPassword: c3RvcmFnZW9z
  csiNodePublishUsername: c3RvcmFnZW9z
  csiNodePublishPassword: c3RvcmFnZW9z
  csiControllerExpandUsername: c3RvcmFnZW9z
  csiControllerExpandPassword: c3RvcmFnZW9z
This example contains a default password, for production installations, use a unique, strong password.
You can define a base64 value by
echo -n "mystring" | base64.
Make sure that the encoding of the credentials doesn’t have special characters such as ‘\n’. The
echo -nensures that a trailing new line is not appended to the string.
If you wish to change the default accounts details post-install please see Managing Users
3 Trigger a StorageOS installation
This is a Cluster Definition example.
apiVersion: "storageos.com/v1"
kind: StorageOSCluster
metadata:
  name: "example-storageos"
  namespace: "storageos-operator"
spec:
  # StorageOS Pods are in kube-system by default
  secretRefName: "storageos-api" # Reference from the Secret created in the previous step
  secretRefNamespace: "storageos-operator"  # Namespace of the Secret
  k8sDistro: "rancher"
  images:
    nodeContainer: "storageos/node:v2.4.0-rc.1" # StorageOS version
  kvBackend:
    address: 'storageos-etcd-client.storageos-etcd:2379' # Example address, change for your etcd endpoint
  # address: '10.42.15.23:2379,10.42.12.22:2379,10.42.13.16:2379' # You can set ETCD server ips
  resources:
    requests:
      memory: "512Mi"
      cpu: 1
#  nodeSelectorTerms:
#    - matchExpressions:
#      - key: "node-role.kubernetes.io/worker" # Compute node label will vary according to your installation
#        operator: In
#        values:
#        - "true"
Additional
specparameters are available on the Cluster Operator configuration page.
You can find more examples such as deployments referencing a external etcd kv store for StorageOS in the Cluster Operator examples page.
Verify StorageOS Installation
[root@master03]# kubectl -n kube-system get pods -w
NAME                                    READY   STATUS    RESTARTS   AGE
storageos-csi-helper-5cf59b5b4-f5nwr    2/2     Running   0          3m
storageos-daemonset-75f6c               3/3     Running   0          3m
storageos-daemonset-czbqx               3/3     Running   0          3m
storageos-daemonset-zv4tq               3/3     Running   0          3m
storageos-scheduler-6d67b46f67-5c46j    1/1     Running   0          3m
The above command watches the Pods created by the Cluster Definition example. Note that pods typically take approximately 65 seconds to enter the Running Phase.
4. License cluster
Newly installed StorageOS clusters must be licensed within 24 hours. Our developer license is free, and supports up to 5TiB of provisioned storage.
To obtain a license, follow the instructions on our licensing operations page.
First StorageOS volume
If this is your first installation you may wish to follow the StorageOS Volume guide for an example of how to mount a StorageOS volume in a Pod.