Velero Backups
Using Velero to backup your StorageOS volumes
Velero is an open source tool to safely backup and restore, perform disaster recovery, and migrate Kubernetes cluster resources and persistent volumes.
Velero consists of the following components:
- A Velero Server in the cluster
- A CLI client
- A restic daemonset in the cluster
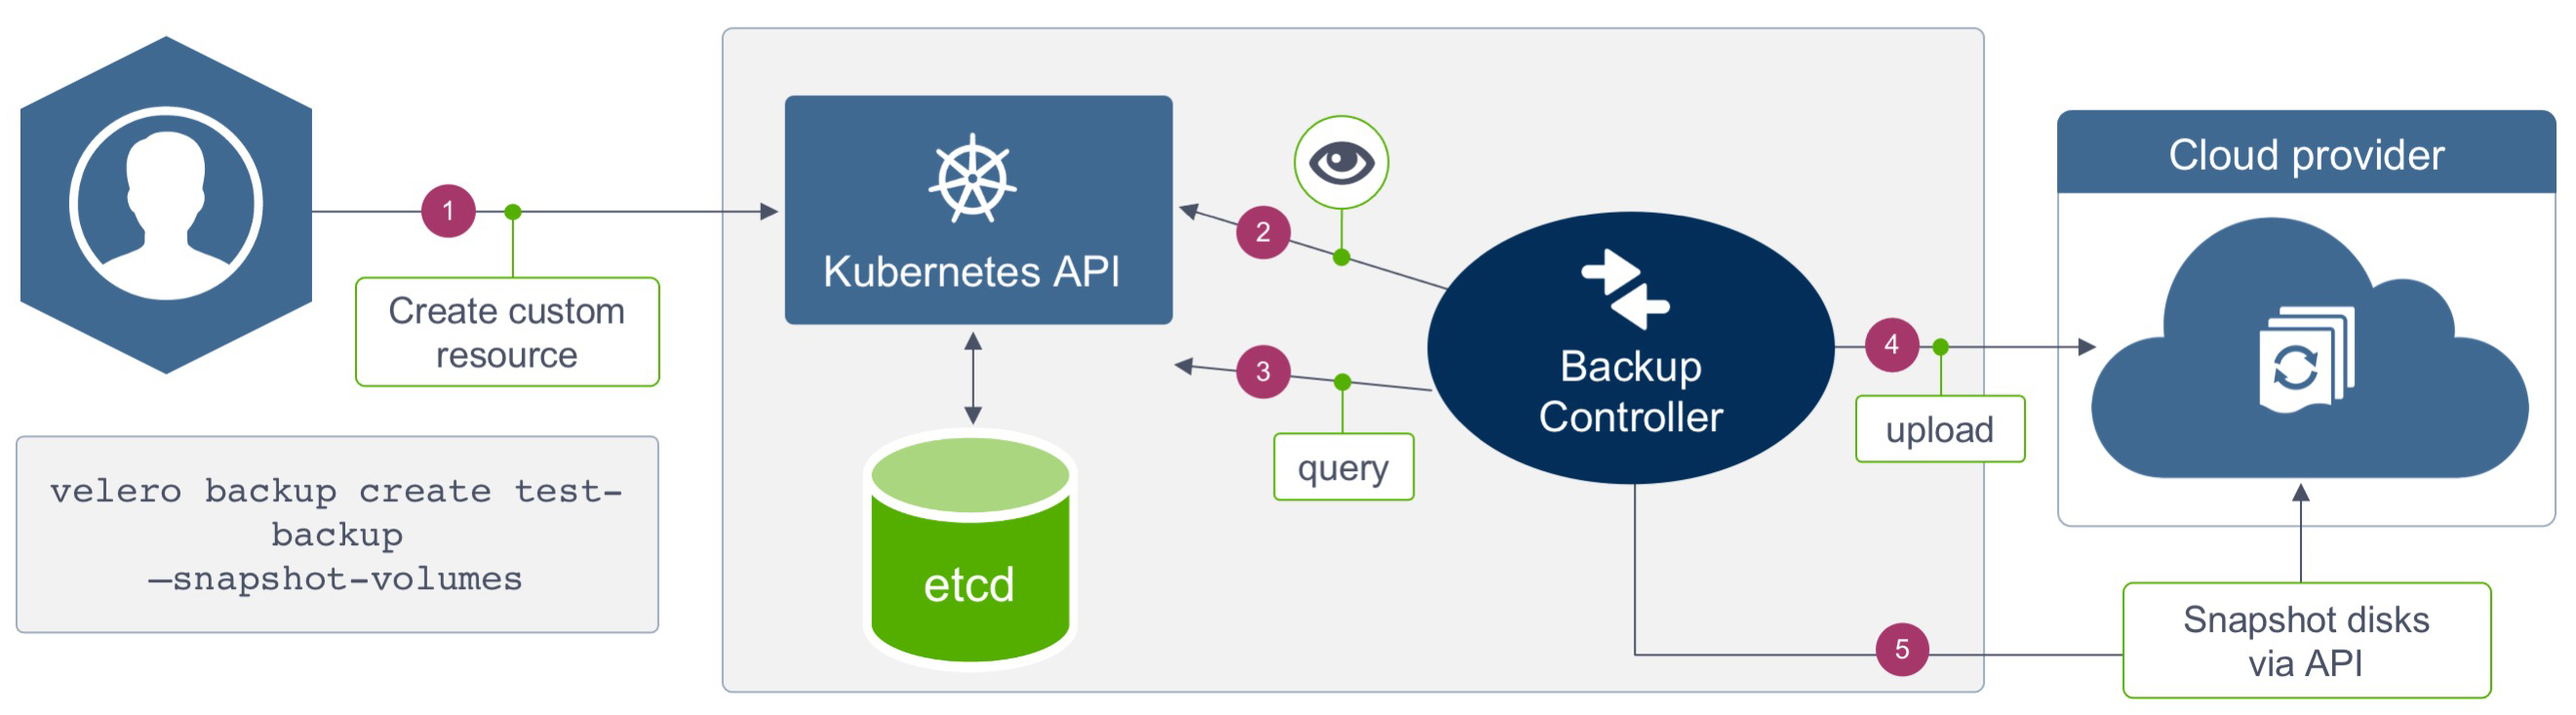
Here’s a diagram on how Velero backups work:
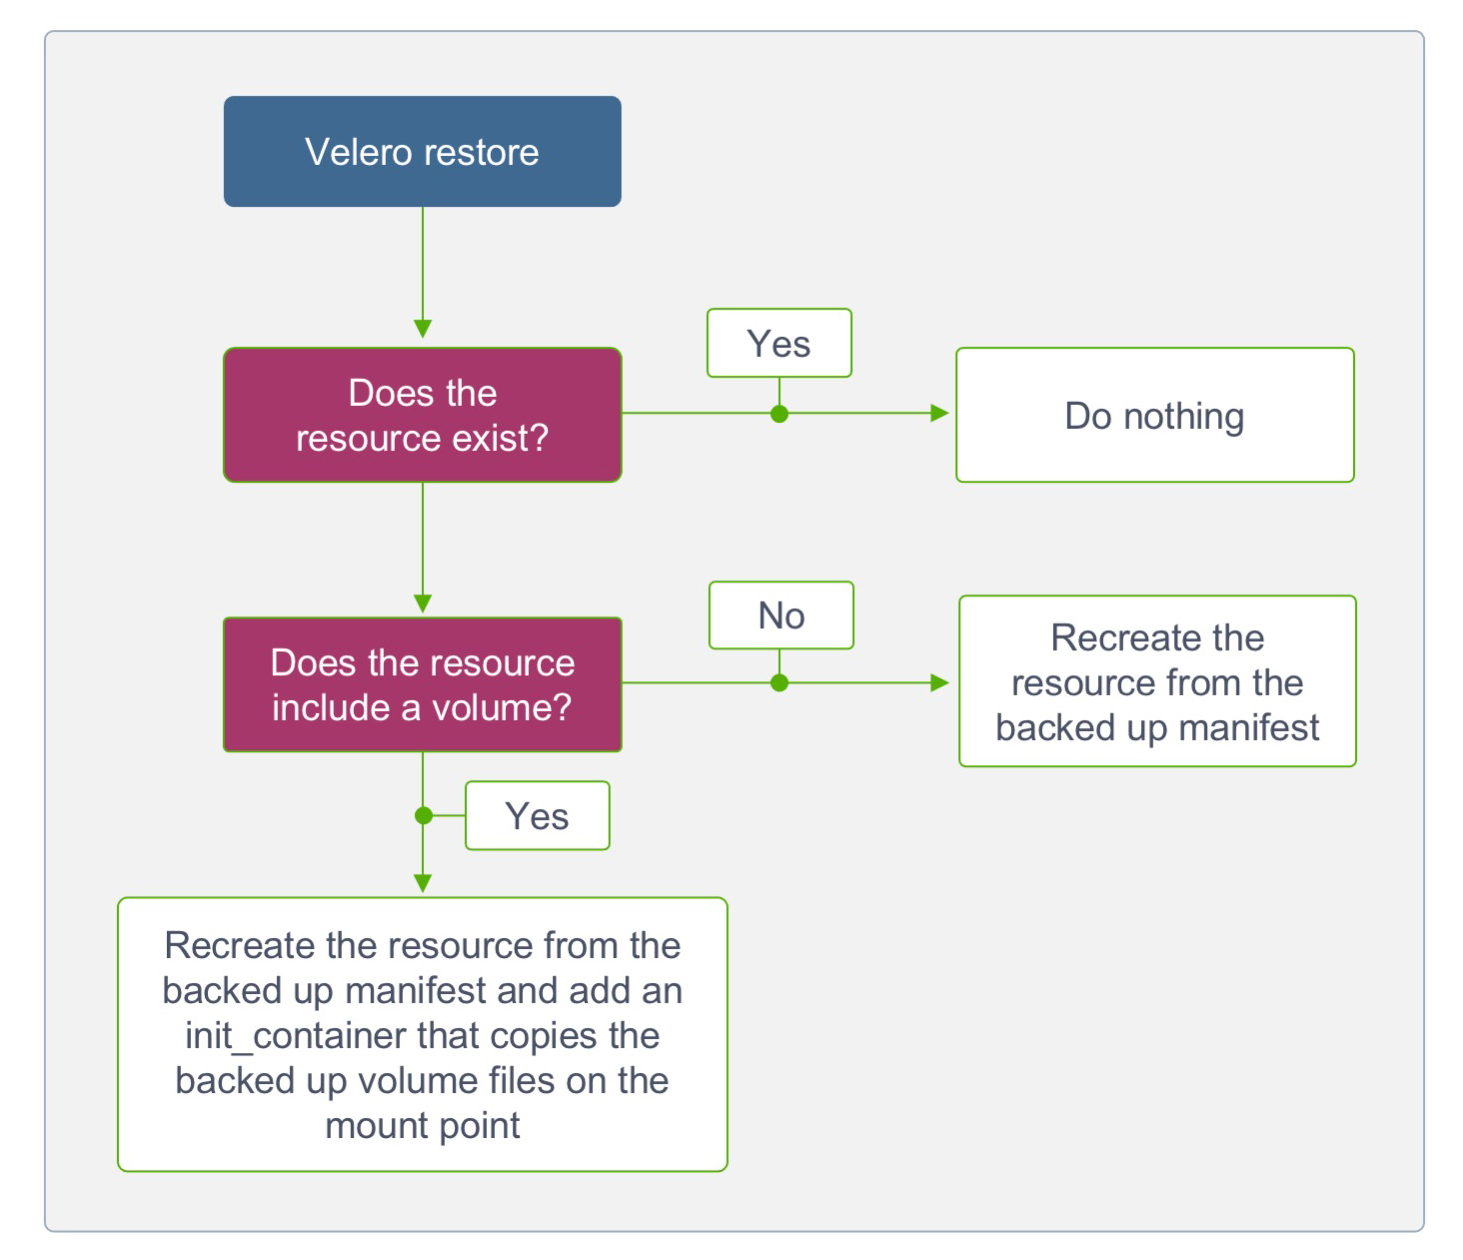
And here’s how Velero restores work:
In our case, we will use MinIO in the Kubernetes cluster as the “cloud provider” pictured in the backup diagram. MinIO is an object store that uses an S3 compatible API and as such can be used to store our backed up resources.
We will set up MinIO through a StatefulSet with a 50GiB StorageOS volume and a ClusterIP service. The UI can be accessed through the browser by port-forwarding the MinIO service.
Velero uses Restic to backup Kubernetes volumes. Restic is a fast and secure backup program for filesystems whose documentation can be found here. The way it works is that it scans the volume directory for its files and then splits those files into blobs which are then sent to MinIO. Here’s how it integrates with Velero.
Prerequisites
Here are the prerequisites for running Velero in your Kubernetes cluster:
- Kubernetes cluster version 1.17 to 1.21 with DNS
- Kubectl installed
- Velero cli installed https://Velero.io/docs/main/basic-install/
Velero can also be installed from a helm chart
Install MinIO with a StorageOS volume
-
First, make sure to clone the StorageOS use cases repository and navigate to the Velero directory:
git clone https://github.com/storageos/use-cases.git cd use-cases/Velero -
Installing MinIO is really simple, just deploy it using the
minio-deploy.yamlmanifest file:kubectl apply -f ./minio -
Confirm that MinIO was deployed successfully:
$ kubectl get pods -n velero
NAME                      READY   STATUS      RESTARTS   AGE
minio-0                   1/1     Running     0          3m48s
minio-setup-zvcdg         0/1     Completed   1          3m47s
You can access the web UI of MinIO by port-forwarding the MinIO service with this command:
kubectl port-forward service/minio -n velero 9000
Install Velero
Use the following command to install Velero via the Velero CLI or alternatively use the helm chart. To install it using the Velero cli, just run this command:
The AWS plugin is being used because MinIO implements the S3 API. This is required even if you’re not using AWS.
velero install                                                                                   \
--provider aws                                                                                   \
--plugins velero/velero-plugin-for-aws:v1.0.0                                                    \
--bucket velero                                                                                  \
--secret-file ./credentials-Velero                                                               \
--use-volume-snapshots=false                                                                     \
--backup-location-config region=minio,s3ForcePathStyle="true",s3Url=http://minio.velero.svc:9000 \
--use-restic
Make sure that Velero is installed correctly:
$ kubectl logs deployment/velero -n velero
...
time="2020-08-25T15:33:09Z" level=info msg="Server started successfully" logSource="pkg/cmd/server/server.go:881"
time="2020-08-25T15:33:09Z" level=info msg="Starting controller" controller=restic-repository logSource="pkg/controller/generic_controller.go:76"
time="2020-08-25T15:33:09Z" level=info msg="Starting controller" controller=restore logSource="pkg/controller/generic_controller.go:76"
time="2020-08-25T15:33:09Z" level=info msg="Starting controller" controller=backup-sync logSource="pkg/controller/generic_controller.go:76"
time="2020-08-25T15:33:09Z" level=info msg="Starting controller" controller=backup logSource="pkg/controller/generic_controller.go:76"
time="2020-08-25T15:33:09Z" level=info msg="Starting controller" controller=backup-deletion logSource="pkg/controller/generic_controller.go:76"
time="2020-08-25T15:33:09Z" level=info msg="Checking for expired DeleteBackupRequests" controller=backup-deletion logSource="pkg/controller/backup_deletion_controller.go:551"
time="2020-08-25T15:33:09Z" level=info msg="Done checking for expired DeleteBackupRequests" controller=backup-deletion logSource="pkg/controller/backup_deletion_controller.go:579"
time="2020-08-25T15:33:09Z" level=info msg="Starting controller" controller=schedule logSource="pkg/controller/generic_controller.go:76"
time="2020-08-25T15:33:09Z" level=info msg="Starting controller" controller=downloadrequest logSource="pkg/controller/generic_controller.go:76"
time="2020-08-25T15:33:09Z" level=info msg="Starting controller" controller=gc-controller logSource="pkg/controller/generic_controller.go:76"
time="2020-08-25T15:33:09Z" level=info msg="Starting controller" controller=serverstatusrequest logSource="pkg/controller/generic_controller.go:76"
Quiesce
Before moving on to the MySQL use case, it is important to talk about quiescence.
To quiesce is to pause or alter a device or application to achieve a consistent
state, usually in preparation for a backup or other maintenance. Quiescence is
very important when backing up real world applications because in flight or
cached write operations of the filesystem during the backup process can cause
corruption of the backed up data. It is a common mistake for engineers to back
up their data without quiescing the filesystem and noticing corruption when they need to
restore from that backup. A simple form of quiescence is the unix command
fsfreeze, but in most cases, application specific quiescence should be used instead.
MySQL use case
For the our use case, we’ll use Velero with a real world application, MySQL.
-
First deploy MySQL, based on the MySQL use case:
kubectl apply -f ./mysqlNotice that the Statefulset also includes 5 annotations:
annotations:
    backup.velero.io/backup-volumes: data
    pre.hook.backup.velero.io/command: '["/sbin/fsfreeze", "--freeze", "/var/lib/mysql"]'
    pre.hook.backup.velero.io/container: fsfreeze
    post.hook.backup.velero.io/command: '["/sbin/fsfreeze", "--unfreeze", "/var/lib/mysql"]'
    post.hook.backup.velero.io/container: fsfreeze
The first annotation specifies which volume to backup using restic. The other annotations are used to perform an fsfreeze on the volume mount point using pre and post backup hooks, for more details about Velero pre/post backup hooks please see their documentation here.
We have to specify to use the
fsfreezeubuntu container since the MySQL container doesn’t support fsfreeze- name: fsfreeze image: ubuntu:bionic securityContext: privileged: true volumeMounts: - name: data mountPath: /var/lib/mysql command: - "/bin/bash" - "-c" - "sleep infinity" -
Wait for the pod to spin up:
$ kubectl get pods -n mysql NAME READY STATUS RESTARTS AGE client 1/1 Running 0 24m mysql-0 2/2 Running 0 24m -
Exec into the MySQL pod and populate it with data using the commands below.
$ kubectl exec mysql-0 -n mysql -ti -c mysql -- mysql mysql> create database shop; mysql> use shop; mysql> create table books (title VARCHAR(256), price decimal(4,2)); mysql> insert into books value ('Gates of Fire', 13.99); mysql> select * from books; +---------------+-------+ | title | price | +---------------+-------+ | Gates of Fire | 13.99 | +---------------+-------+ 1 row in set (0.00 sec) mysql> exit -
Create the Velero backup:
velero backup create mysql-backup --include-namespaces mysql --wait -
Confirm that all the Kubernetes objects are there and the restic backups completed successfully:
velero backup describe mysql-backup --details -
After the backup is finished, delete the StatefulSet and PVC.
N.B. It’s important to make sure that the StatefulSet is deleted because the restore would be unable to complete if a StatefulSet pod is recreated during the restore process.
kubectl delete statefulset mysql -n mysql kubectl delete pvc data-mysql-0 -n mysql -
Make sure that the pod is fully terminated:
$ kubectl get pods -n mysql NAME READY STATUS RESTARTS AGE client 1/1 Running 0 25m -
Restore MySQL using Velero:
velero restore create --from-backup mysql-backup --wait -
Wait for the MySQL pod to spin up and see if the data is backed up:
$ kubectl exec mysql-0 -n mysql -ti -c mysql -- mysql
mysql> use shop;
mysql> select * from books;
+---------------+-------+
| title         | price |
+---------------+-------+
| Gates of Fire | 13.99 |
+---------------+-------+
1 row in set (0.00 sec)
mysql> exit
The data should be there and the backup was restored successfully!